
Create an arena
Before You Start
ToBefore createcreating ayour newfirst arena from scratch,arena, we recommend the following:recommend:
Activate yourEnable server whitelist to preventanyoneplayers fromenteringjoining whileyou areyou're configuringthe arena.- Prepare
allyour worlds in advance:- Main lobby world
- Waiting lobby area
- Minigame maps
to(these will be configuredbeforelater)
enteringsetup mode. (Main Lobby, Waiting Lobby, Mini-games like race, etc...) - Use
completely emptyvoid worldstoforavoidoptimalperformanceperformance.losses.WeFor example, you can userecommend VoidGenfortothis.generate empty worlds
Set the Main Lobby
Before youcreating start setting up anany arena, make sure you havemust set the main lobby spawn point. This is where players will be teleported after finishing an arena or leaving a game.
/baa setmainlobby
Stand at your desired main lobby location and execute this command.
Creating an Arena
Step 1: Create the Arena
Choose between two arena modes:
- Standalone Mode: Single minigame per arena (like a dedicated Spleef arena)
- Party Mode: Multiple minigames with
"rounds (recommended for variety)
/babaasetmainlobbycreate [id] <standalone|party>"
Examples:
/baa create 1 party
/baa create 2 standalone
Arena ID Tips:
- Use sequential numbers (1, 2, 3...) for organization
- IDs must be unique
- You cannot change the ID later
Step 2: Configure Basic Settings
Set Arena Name
Give your arena a display name that players will see:
/baa arena [id] setname [name]
Examples:
/baa arena 1 setname Party Games Arena
/baa arena 1 setname &a&lMega Arena &7#1
/baa arena 2 setname &b&lSpleef &r&7Arena
Note: You can use Minecraft color codes with & (e.g., This&a for green, &l for bold)
Set Waiting Lobby
The waiting lobby is where players willwait teleportbefore the game starts. Teleport to whenyour theydesired finish an arena.
Setup Process
To start, you must enter the command "/ba setup id". The ID is the identifier of each arena, you can use the one you want, but we recommend to start with 1location and continue with the following numbers in future arenas to have an order.execute:
After
/baa enteringarena this[id] command,setlobby
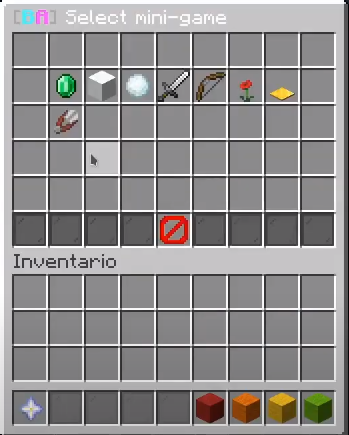
you will enter setup mode and the following blocks will appear in the inventory:
SlotYour1current(beacon):positionStepAND1 block (explained below)Slot 6 (red wool): Cancel setup (deletes arena configuration)Slot 7 (orange wool): Pause setupSlot 8 (yellow wool): Previous stepSlot 9 (green wool): Next step
Step-by-Step Configuration
Step 1
Set up the waiting lobby (where players will wait for the arena to start) with the beacon in your inventory.
Note: Theviewing direction you are facing will be saved
for
Whendirection done,you clickwere slotfacing
Stepcorrect 2
world 
Configure Player Limits
Set the minimum and maximum players:
Slot 1 (slime ball): Minimumof players(right-clickfortothedecrease,arena:left-click/baatoarenaincrease)[id] Slotminplayers2[amount](redstone):/baaMaximumarenaplayers[id]
Note:Examples:
/plugins/BlueArcade/data/arenas/id.ymlwhen server is offline.
Step 3
Configure the arena name:
Click slot 1 (nametag)Type the name in chat (supports color codes)Example: "PG-01" for "Party Games"baa arena 1
Stepminplayers 4/baa
Select mini-game to configure:
- 12
Click slotarena 1(nethermaxplayersstar)Choose from menu:
Available mini-games:
RaceSpleefSnowball FightAll Against AllOne In The ChamberTraffic LightMinefieldExploding SheepTNT TagRed AlertFast ZoneKnockbackRun From The BeastBlock Party
After selection, seemini-game setup guide.


Configuration Notes:Requirements:
- Minimum:
12-64mini-game per arenaplayers - Maximum:
Unlimited2-64 players ForMinsingle-roundplayersarenas:cannot exceed max players
Set Arena Mode (Optional)
If you want to change the arena mode after creation:
/baa arena [id] setmode <standalone|party>
Important Restrictions:
ManuallyStandaloneeditMode:/plugins/BlueArcade/data/arenas/id.yml- If you try to switch to standalone with multiple minigames, you'll get an error
SetRemovelineextra16minigames first
- Party Mode: Can have unlimited minigames
- Recommended to
"1"havewhenatserverleastis3-5offlineminigames for variety
- Recommended to
Set Number of Rounds (Party Mode Only)
/baa arena [id] setrounds [number]
Example:
/baa arena 1 setrounds 7
Requirements:
- Only works in party mode
- Must be between 3-15 rounds
- Default is 5 rounds
Step 3: Verify Configuration
Check that everything is configured correctly:
/baa info [id]
This will show:
- Arena name
- Mode (standalone/party)
- Status (ENABLED/DISABLED)
- Player limits
- Number of rounds (party mode)
- Configured minigames (if any)
- Waiting lobby location
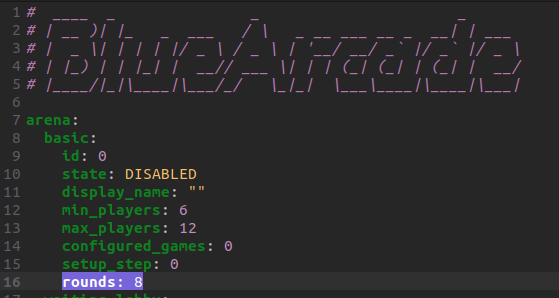
Example output:
Arena 1 information:
 Name: Party Games Arena
 Mode: party
 Status: DISABLED
 Players: 4-12
 Rounds: 7
 Minigames: Not configured yet
 Lobby: world (100.5, 64.0, 200.5)
VideoArena TutorialStatus
Your arena starts in DISABLED status and cannot be joined by players until:
- You configure at least one minigame (see next guide)
- You enable the arena with
/baa enable [id]
Quick Reference Commands
| Action | Command |
|---|---|
| Create arena | /baa create [id] <standalone|party> |
| Set name | /baa arena [id] setname [name] |
| Set lobby | /baa arena [id] setlobby |
| Set min players | /baa arena [id] minplayers [amount] |
| Set max players | /baa arena [id] maxplayers [amount] |
| Set mode | /baa arena [id] setmode <standalone|party> |
| Set rounds | /baa arena [id] setrounds [number] |
| View info | /baa info [id] |
| List arenas | /baa list |
| Delete arena | /baa delete [id] confirm |
Next Steps
Now that your arena is created and configured, you need to:
- Add minigames to the arena
- Configure each minigame (bounds, spawns, etc.)
- Enable the arena for players to join
Continue to the Configure Minigames guide to complete your arena setup.
Troubleshooting
"Arena already exists"
- Each ID can only be used once
- Use
/baa listto see existing arenas - Choose a different ID number
"Cannot enable arena. Complete the configuration first"
- You need at least one configured and enabled minigame
- Check
/baa info [id]to see what's missing
"Cannot change to standalone mode. This arena has multiple minigames"
- Remove extra minigames with
/baa game [id] remove [minigame] confirm - Or keep it in party mode
"Minimum players cannot be greater than maximum players"
- Set max players first, then min players
- Or adjust both values to be compatible